Thursday 17 January 2013

Working With 2/3 level Cascading Dropdown In Sharepoint List

Sometimes we face such limitations or issues, requirements where we need to do some custom coding in sharepoint. obviously this hampers performance and consumes time in developing forms and testing it. 

Simply, i wanted to create a list where i need to implement cascading Dropdowns. most of us are familiar with such scenarios like Country, State, District dropdown are filled up one by one depending on selection of previous dropdownlist. For such simple requirement we may need to invest time in custom code and testing.

Below image can give a better idea about given scenario.


Here i wanted to create a list of category, sub-categories and Store. my store list includes look up for category and sub-category which i need to fill-up on the basis of selection of fist dropdown value. lets see how it works. i will try to guide through images as we all know that we hate reading and require faster output.

List Structure:

1. Created a list Category.(List Name:Category)
Image:1
2.Created Sub-Category List (List Name:SubCategory)
Image:2
In this list, I have look-up column 'RequestCategory' for 'Title' in 'Category' list.

3.Created a list where we expect to select cascading dropdown while adding or editing a item into list(List Name:Store).
Image:3

In this case if you observe add, edit form. it will bring all items from 'SubCategory' (2nd list) and not only in which we are interested in by selecting    Item from 'Category' (1st List).

Solution:
To resolve this problem we need following (.js) files.

2.jquery.SPServices click here for latest version

add content editor webpart where you want to make cascading dropdown work.

put below script into content editor webpart:

<script language="javascript" src="/sites/Home/Requisition/Shared%20Documents/jquery-1.9.0.js" type="text/javascript"></script>
<script language="javascript" src="/sites/Home/Requisition/Shared%20Documents/jquery.SPServices-0.7.2.js" type="text/javascript"></script>
<script language="javascript" type="text/javascript">
      ExecuteOrDelayUntilScriptLoaded(loadCascadingDDL, "sp.js");
      function loadCascadingDDL() 
                {
                          $().SPServices.SPCascadeDropdowns({
                                       relationshipList: "SubCategory",
                                       relationshipListParentColumn: "RequestCategory",
                                       relationshipListChildColumn: "Title",
                                       parentColumn: "ItemCategory",
                                       childColumn: "ItemSubCategory",
                             });

                }
</script>

Here in above example parameters are below:

relationshipList: is the list name of 2nd image.(SubCategory list)
relationshipListParentColumn:Parent column from 2nd image(parent look-up column in SubCategory List)
relationshipListChildColumn:The child field name which you want to display on second dropdown(from SubCategory List/ 2nd image)
parentColumn:The field name which you want to treat as a parent column(from list where you want to input data/3rd image)
childColumn:The field name which you want to treat as a child column(from list where you want to input data/3rd image)

all this works for add/Edit item as well and we don't require any custom coding.
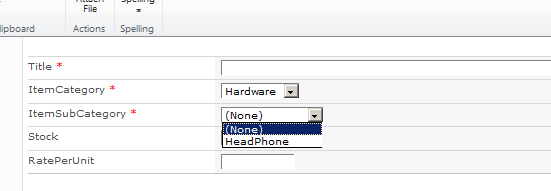
Output:


Note: it can fail or will not respond, if you do have space,-,(,) characters in your field name.

Going ahead question may raise in your mind that is it possible to create  three level cascading dropdowns? i'll say, why not?
In this case we will repeat same function for next cascading dropdwon.

Three level cascading dropdownlist:

I created a new list 'Request' where i need to refer all above lookups with this list. below is screeenshot for list.


and my output should be:


And my code would be:

<script language="javascript" src="/sites/Home/Requisition/Shared%20Documents/jquery-1.9.0.js" type="text/javascript"></script>
<script language="javascript" src="/sites/Home/Requisition/Shared%20Documents/jquery.SPServices-0.7.2.js" type="text/javascript"></script>
<script language="javascript" type="text/javascript">
      ExecuteOrDelayUntilScriptLoaded(loadCascadingDDL, "sp.js");
      function loadCascadingDDL() 
                {
                          $().SPServices.SPCascadeDropdowns({
                                       relationshipList: "SubCategory",
                                       relationshipListParentColumn: "RequestCategory",
                                       relationshipListChildColumn: "Title",
                                       parentColumn: "ItemCategory",
                                       childColumn: "ItemSubCategory",
                             });
                          $().SPServices.SPCascadeDropdowns({
                                       relationshipList: "Store",
                                       relationshipListParentColumn: "ItemSubCategory",
                                       relationshipListChildColumn: "Title",
                                       parentColumn: "ItemSubCategory",
                                       childColumn: "Request",
                             });

                }
</script>


Thanks!!!

Tuesday 27 March 2012

Creating a WebPart with a custom ToolPart properties

Add custom properties to WebPart:

Most of the times you need to add custom properties to your webpart to support funtionality. I want to explain here the simplest and understandable way to show custom properties to webpart toolpart.


I was used to add custom properties into webpart.cs file just like below.


[WebPartStorage(Storage.Shared)]    //available in both Personalization and Customization mode.
[Personalizable(PersonalizationScope.Shared)]
[FriendlyNameAttribute("Header")]                   //will be displayed to user
[Description("Sets webpart title")]                   //will be displayed on tooltip
[WebBrowsable(true)]                                   //hide or show
[Category("UI Configuration")]                        //category name where to be shown
[XmlElement(ElementName = "String")]
public string WebPartHeader
{
     get;
     set;
}


output:
Above property definition was working correctly for my web parts, But i got issue with some of the OOB extended web parts while creating such complex properties with above way. some of the times i found my properties messed up.
I found below workaround to implement complex custom properties.

Create ToolPart to add custom properties:

Follow steps specified below to add custom properties.
  • Create .cs file (Inheriting from Microsoft.SharePoint.WebPartPages.ToolPart):
This class is basically has same code as we code for webpart. In 'CreateChildControl()' method you write the code to create controls which will be shown into toolpart.
This requires the original instance of webpart from toolpart which can be collected through below codeline.

ExtendedWebpart webPart = ( ExtendedWebpart )this.ParentToolPane.SelectedWebPart;

and as above code gives us instance of editing web part, we can have retrieve and assign back values to be reflected from 'CreateChildControls()' and 'ApplyChanges()' methods respectively.

Sample Code ExtendedToolPart:

       CheckBox chkEnableOOBSupport;

        protected override void CreateChildControls()
        {
            base.CreateChildControls();
            ExtendedWebpart webPart = ( ExtendedWebpart )this.ParentToolPane.SelectedWebPart;
         
            Panel toolPartPanel = new Panel();
            Controls.Add(toolPartPanel);           
           
            chkEnableOOBSupport = new CheckBox();
            toolPartPanel.Controls.Add(chkEnableOOBSupport);

            //below property already specified in webpart (cs) file.
            chkEnableOOBSupport.Checked = webPart.chkEnableOOBSupport;
            chkEnableOOBSupport .ID = "chkEnableOOBSupport";
            chkEnableOOBSupport .CssClass = lblCssClass;
            chkEnableOOBSupport .Text = "Enable OOB Support</br>";
       }

    public override void ApplyChanges()
       {
            EnsureChildControls();
            base.ApplyChanges();
            //Get webpart instance
             ExtendedWebpart webPart = (ExtendedWebpart  )this.ParentToolPane.SelectedWebPart;
            webPart.chkEnableOOBSupport  =  chkEnableOOBSupport.Checked;
        }

To give title for ToolPart write below codeline in contructor:

this.Title = "OOB Support";


Half of the job is done, now you have to create instance of above class and add it to the 'ToolPart'. how will you do that? you have to override 'GetToolParts()' method and add instance of toolpart in the first position.

Sample Code for ExtendedWebpart.cs

        /// <summary>
        /// Overridden GetToolParts Method.
        /// </summary>
        /// <returns></returns>
        public override ToolPart[] GetToolParts()
        {
           // resize the tool part array 
           ToolPart[] toolparts = new ToolPart[3];
           // instantiate the standard SharePopint tool part 
           WebPartToolPart wptp = new   WebPartToolPart();
           // instantiate the custom property toolpart if needed. 
           // this object is what renders our regular properties. 
           CustomPropertyToolPart custom = new CustomPropertyToolPart();
           // instantiate and add our tool part to the array. 
           // tool parts will render in the order they are added to this array. 
           toolparts[0] = new  ExtendedToolPart();
           toolparts[1] = custom;
           toolparts[2] = wptp;
           return toolparts;        
         
        }

By using above code we can have our custom controls added in toolpart with  our customization like validations, dependency etc.
Above code for extended WebPart worked perfectly for me and creates custom properties.


Working With 2/3 level Cascading Dropdown In Sharepoint List

Sometimes we face such limitations or issues, requirements where we need to do some custom coding in sharepoint. obviously this hampers per...